

By Usman Hassan — Network & Systems Engineer, Microsoft Certified Trainer (MCT since 2021), 15 years of IT experience. Last updated: October 14, 2026.
Figuring out how to install Kali Linux trips up more beginners than any actual penetration test. You download the ISO, stare at partitioning options, and suddenly you’re Googling whether you just wiped your primary drive.
This guide walks you through four proven installation methods (VirtualBox, VMware, bare metal with an optional dual boot, and a bootable USB) so you can pick the one that matches your hardware and risk tolerance. The steps were written on Kali 2026.1 and still apply to Kali 2026.2, the current release from OffSec, and they include the troubleshooting fixes most guides leave out.
Key Takeaways
- Safest path for beginners: Install Kali Linux on VirtualBox — it runs inside your existing OS with zero risk to your main drive.
- Hardware minimums: 2 GB RAM, 20 GB disk, and a 64-bit processor. For real-world tool usage, aim for 4 GB+ RAM and an SSD.
- Current version: Kali 2026.2 (as of October 2026). Kali 2026.1 shipped March 24, 2026 with Linux kernel 6.18 and Xfce 4.20.6, and the install steps are the same for both.
- Four methods covered: VirtualBox (safest), VMware (prebuilt image, quickest VM setup), bare metal with optional dual boot (fastest performance), and bootable USB (portable, no install needed).
Table of Contents
What Is Kali Linux and Why Install It?
Kali Linux is a Debian-based Linux distribution developed and maintained by OffSec, purpose-built for penetration testing, digital forensics, and security auditing. It ships with over 600 preinstalled tools — including Metasploit, Nmap, and Wireshark — that security professionals and ethical hackers rely on daily.
If you are studying for cybersecurity certifications or building a home lab, Kali is the standard training environment. ITPro Academy is a tutorials platform that publishes step-by-step networking (CCNA, CCNP), Linux, virtualization (ESXi, Docker, Proxmox), and Azure cloud guides for IT beginners — and Kali installation is one of the most-requested topics from our readers.
You don’t need to be a Linux expert. If you can follow a recipe, you can install Kali.
What Are the Kali Linux System Requirements?
You need at minimum a 64-bit processor, 2 GB of RAM, and 20 GB of free disk space. For running graphical tools comfortably, OffSec recommends 4 GB+ RAM and an SSD. Here’s the full breakdown according to the official Kali documentation:
| Spec | Minimum | Recommended |
|---|---|---|
| Processor | 64-bit (amd64) | Dual-core or better |
| RAM | 2 GB | 4–8 GB |
| Storage | 20 GB | 50 GB+ (SSD preferred) |
| Firmware | BIOS or UEFI | UEFI |
| Network | Any adapter | Wi-Fi card for wireless testing |
If you are running Kali inside a virtual machine, these requirements apply to the VM’s allocation, not your total system specs. Your host machine needs enough headroom on top.
Which Installation Method Should You Choose?
Pick VirtualBox or VMware if you’re new to Linux. Pick bare metal if you need full hardware performance. Pick USB if you want portability without installing anything. Here’s how the four methods compare:
| Factor | VirtualBox | VMware | Bare Metal | Bootable USB |
|---|---|---|---|---|
| Difficulty | Easiest | Easy (prebuilt image) | Moderate | Easy |
| Risk to host OS | None | None | High (overwrites disk) | None |
| Performance | Good, slower than native | Good, slower than native | Native | Depends on USB speed |
| Persistence | Full (saved on virtual disk) | Full (saved on virtual disk) | Full | Optional (configure persistent partition) |
| Best for | Learning, lab work | Lab work, longer-term VMs | Dedicated pen-test machine | On-the-go testing, live demos |
| Wi-Fi card access | Requires USB passthrough | Requires USB passthrough | Direct access | Direct access |
| Cost | Free | Free for personal use | Free | Free |
Most beginners should start with VirtualBox. I’ve set up Kali labs for dozens of students over the years, and the VM route avoids every “I accidentally formatted my laptop” story.
VirtualBox vs VMware: Which Is Better for a Kali Linux Virtual Machine?
Both run a Kali Linux virtual machine well, and both cost nothing for home labs. VMware Workstation Pro became free for personal use in November 2024, so price no longer decides it.
I reach for VirtualBox on a fresh lab machine because it installs in a minute and needs no account. VMware wins when you want Kali’s prebuilt image to just work: screen resizing, clipboard sharing, and USB Wi-Fi passthrough usually need less fiddling. If you already run EVE-NG on VMware Workstation, keeping Kali in the same hypervisor makes your whole lab easier to manage.
Whichever you choose, hardware virtualization must be switched on. Enable Intel VT-x or AMD-V (sometimes labeled SVM Mode) in your BIOS/UEFI before you create the VM. Without it, the VM either refuses to start or crawls.
How to Install Kali Linux on VirtualBox
Download the Kali ISO from kali.org, create a new VM in VirtualBox, attach the ISO, and follow the graphical installer. The whole process takes about 20–30 minutes. Here are the steps:
Step 1: Download the Kali Linux ISO
Go to kali.org/get-kali and download the Installer image for 64-bit (amd64). As of October 2026, the current version is Kali 2026.2. The screenshots in this guide were taken on Kali 2026.1 (released March 24, 2026, with Linux kernel 6.18 and Xfce 4.20.6), and the installer steps have not changed. The ISO is roughly 4 GB. Before using it, compare its SHA256 checksum with the one listed on the download page:
# Windows (PowerShell)
Get-FileHash kali-linux-2026.2-installer-amd64.iso -Algorithm SHA256

# Linux
sha256sum kali-linux-2026.2-installer-amd64.iso

# macOS
shasum -a 256 kali-linux-2026.2-installer-amd64.iso
If the two strings don’t match, delete the file and download it again.
Step 2: Create a New Virtual Machine
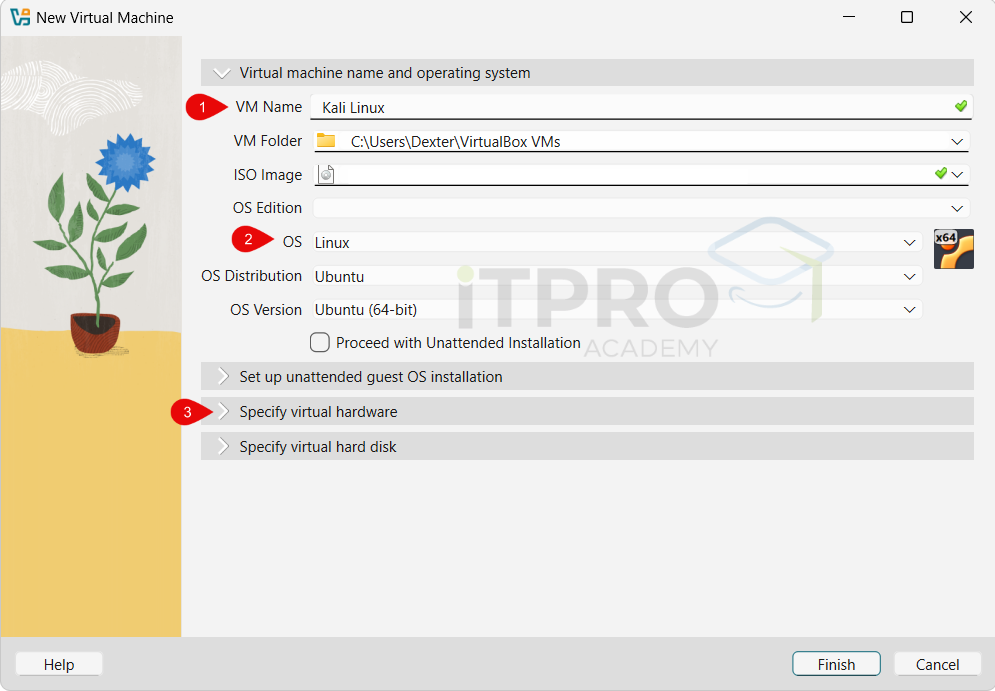
- Open VirtualBox (version 7.x recommended), click New, and configure:
- Name: Kali Linux
- OS: Linux
- Version: Debian (64-bit)
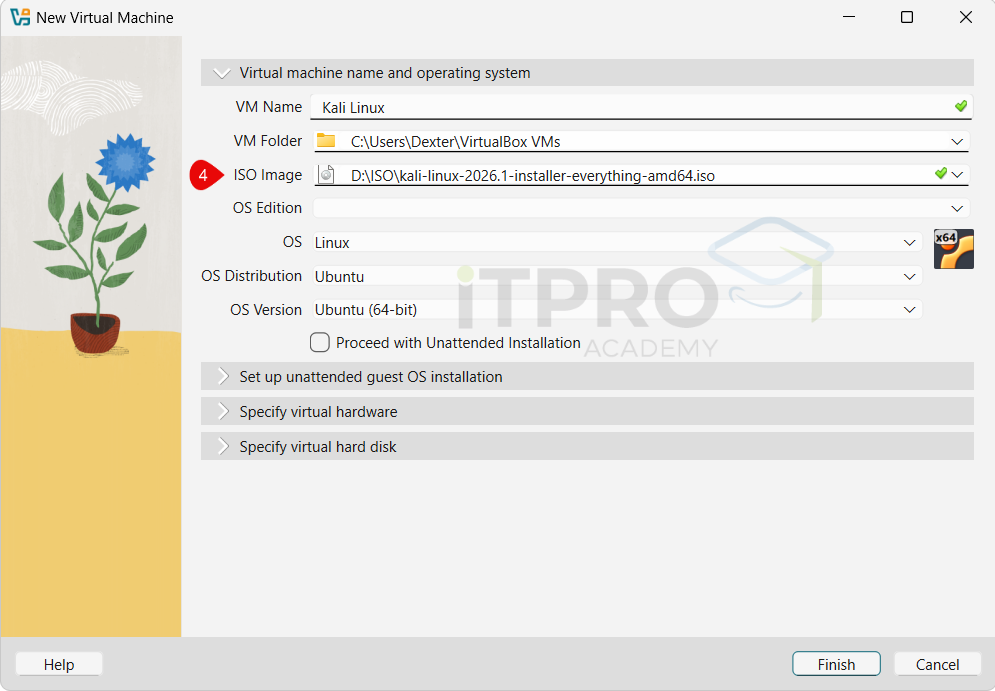
- Attach the ISO: browse to the folder where you downloaded the Kali ISO and select it as the boot disk.
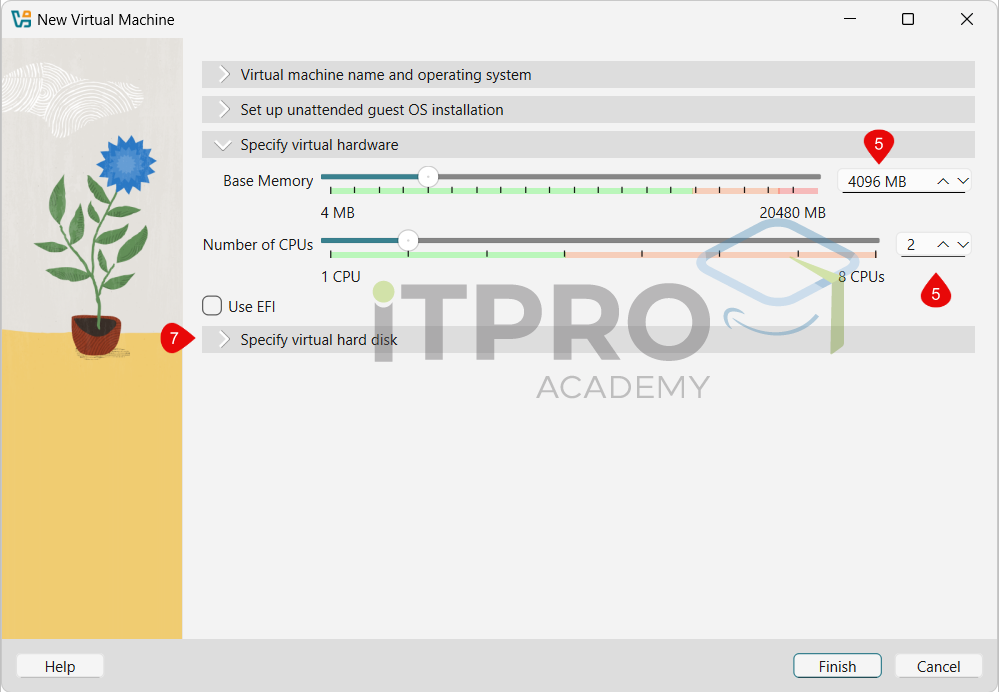
- Assign RAM: 4096 MB (minimum 2048 MB) and at least 2 CPU cores.
- Create the hard disk: a VDI virtual hard disk, dynamically allocated, 40 GB or more.
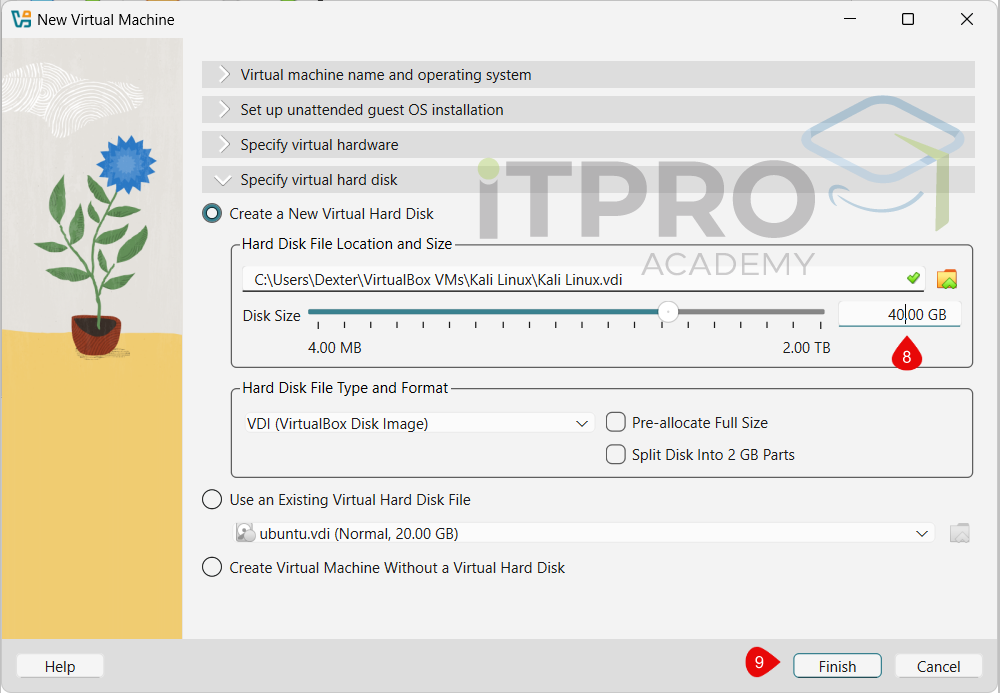
Click Finish, then Start the virtual machine.
Step 3: Run the Graphical Installer
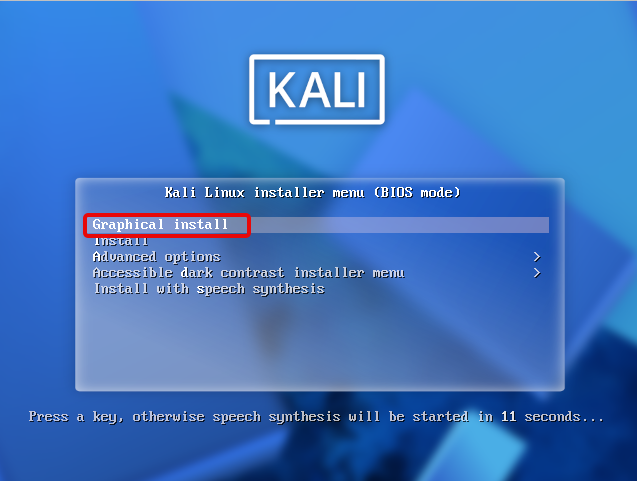
- Select Graphical Install from the boot menu. Walk through:
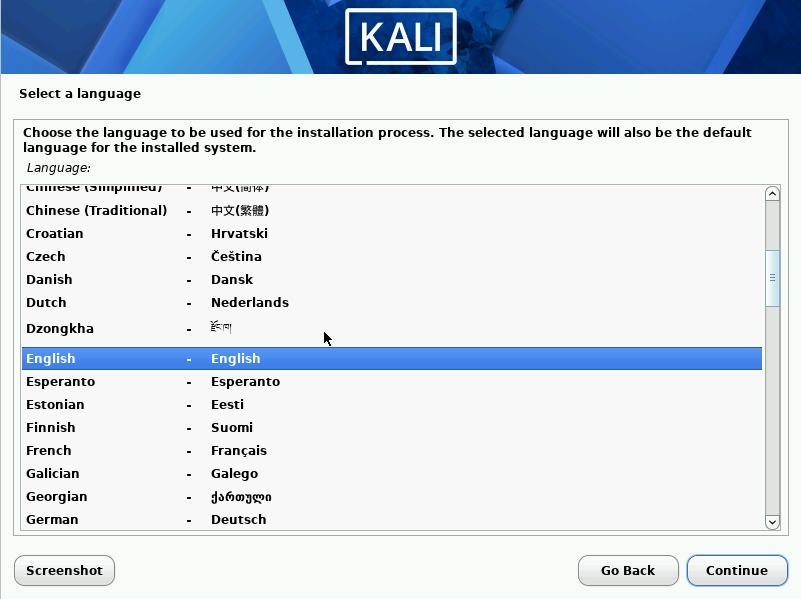
- Select the Language, location, keyboard — pick your locale.
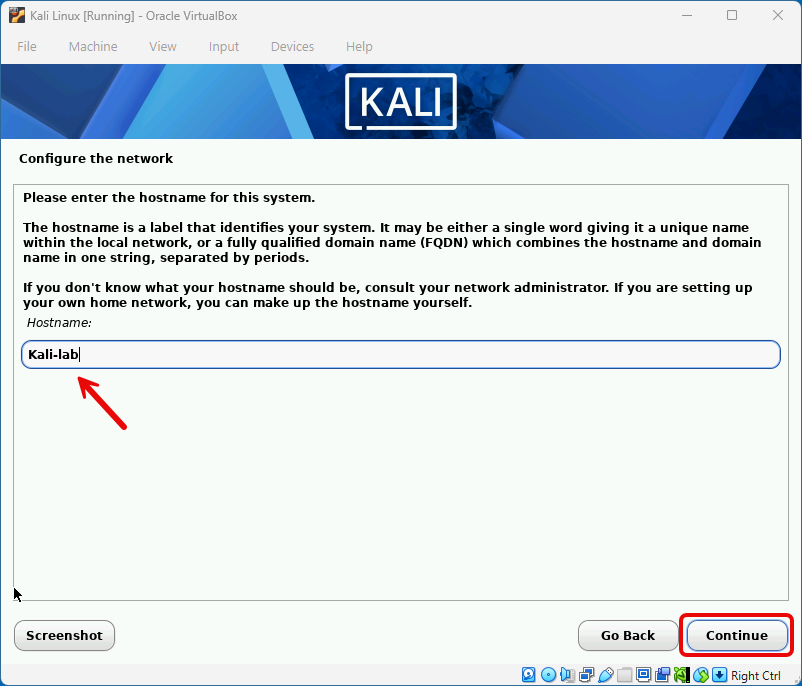
- Hostname — enter any name (e.g.,
kali-lab). Leave domain blank.
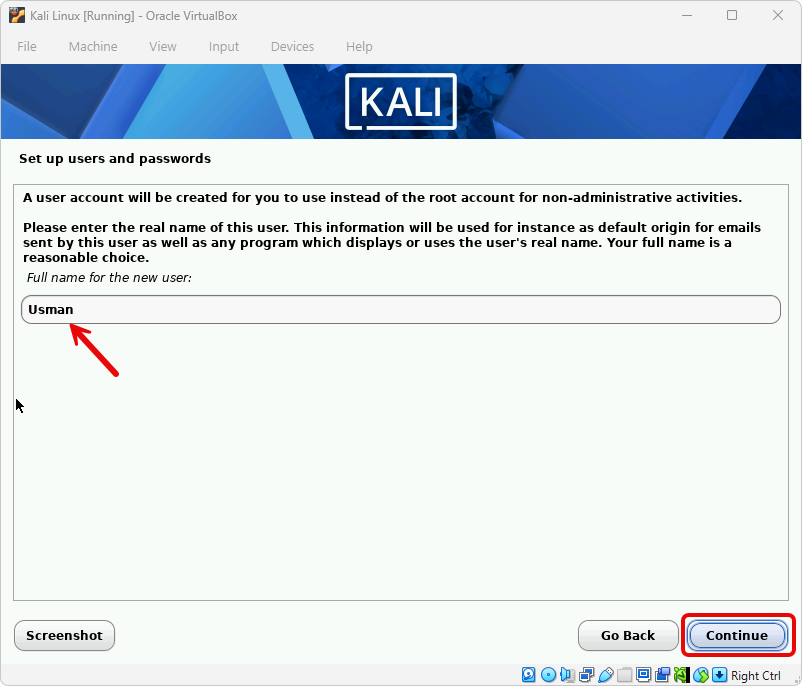
- User account — set your full name, username, and a strong password.
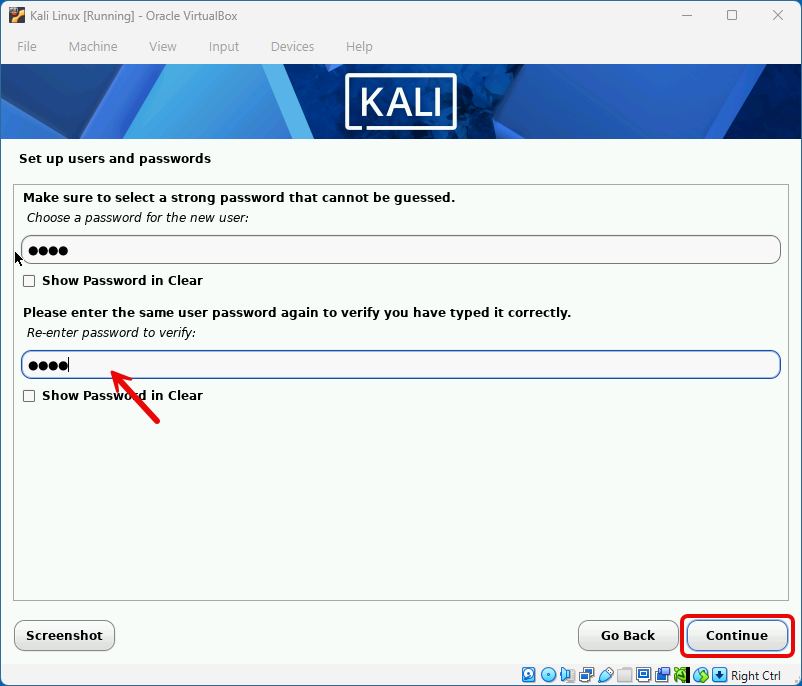
- Set the password (use a strong one; this account gets sudo rights)
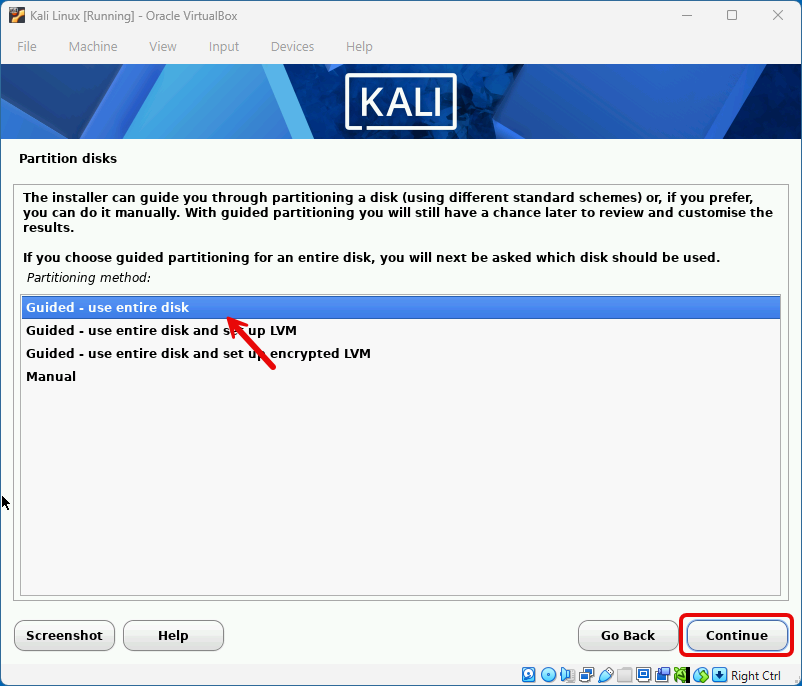
- Partitioning — choose Guided – use entire disk. This only affects the virtual disk, not your real drive.
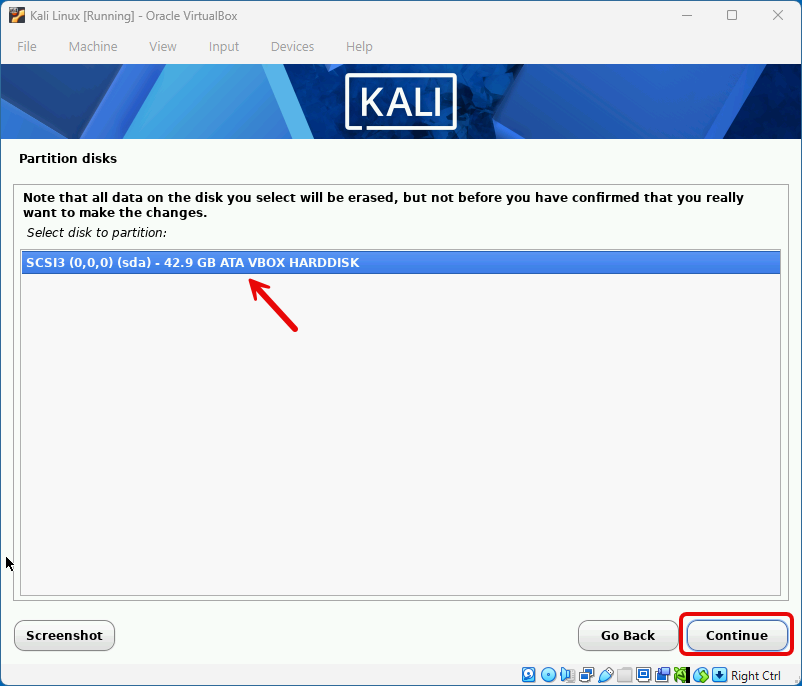
- Select the Disk for Partition
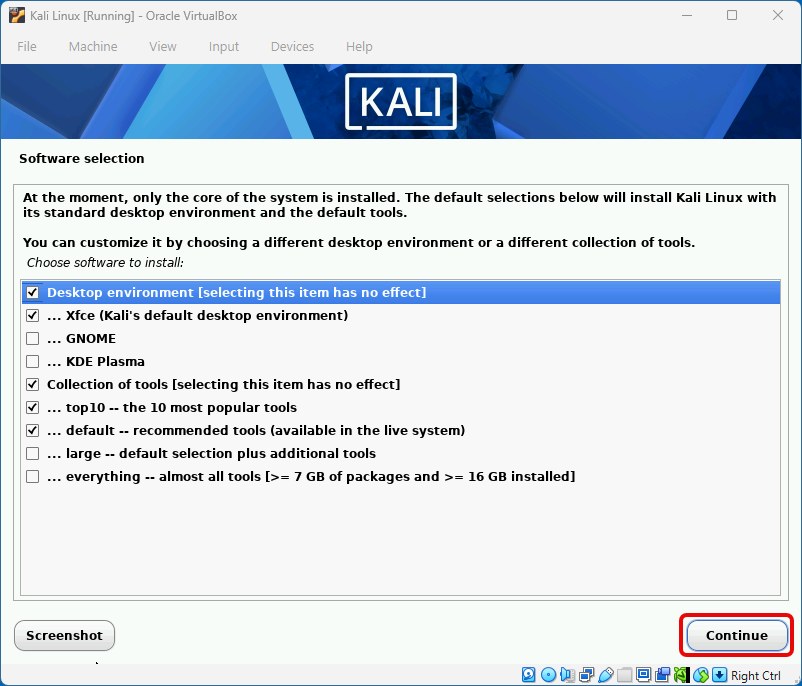
- Package selection — keep the default Xfce desktop and the default tool collection.
- GRUB bootloader — install to the primary disk (
/dev/sda). Confirm.
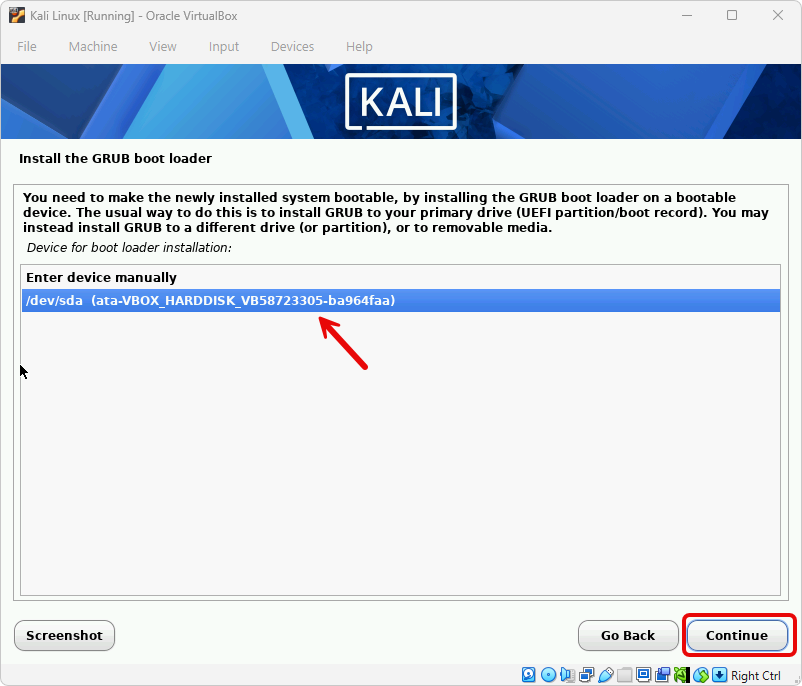
The installer copies files for 10–15 minutes. When it finishes, remove the ISO from the virtual drive, reboot, and log in.
Step 4: Install Guest Additions
After login, open a terminal and run:
sudo apt update && sudo apt install -y virtualbox-guest-x11Reboot. You now get full-screen resolution, shared clipboard, and drag-and-drop between host and guest.
To confirm the Guest Additions package is installed, run:
dpkg -l | grep virtualbox-guest-x11How to Install Kali Linux on VMware
The quickest route is Kali’s prebuilt VMware image: download it, extract it, and open it in VMware Workstation. Install from the ISO instead if you want to pick your own username and disk layout. VMware Workstation Pro is free for personal use on Windows and Linux; on a Mac, use VMware Fusion.
Option A: Import the Prebuilt Kali VMware Image
- Go to kali.org/get-kali and download the VMware image (for example
kali-linux-2026.2-vmware-amd64.7z). - Extract the
.7zarchive with 7-Zip. You get a folder with a.vmxfile and several virtual disk files. - In VMware Workstation, choose File → Open, select the
.vmxfile, and click Power on this virtual machine. If VMware asks whether you moved or copied the VM, pick I Copied It. - Log in with the default username
kaliand passwordkali, then change the password straight away withpasswd.
Option B: Install Kali Linux on VMware from the ISO
- Click Create a New Virtual Machine, choose Custom (advanced), and point the wizard to the Kali installer ISO.
- For the guest operating system, select Linux and the newest Debian 64-bit version in the list.
- Give the VM at least 2 CPU cores, 4096 MB of RAM, and a 40 GB+ virtual disk. Keep the default NAT network.
- Before the first boot, open VM Settings → Display and make sure Accelerate 3D graphics is turned off, as Kali’s own documentation recommends.
- Power on the VM and follow the same graphical installer shown in the VirtualBox section above, from Graphical Install through to GRUB.
Install VMware Tools in Kali
The Kali installer usually detects VMware and adds the guest tools for you. If the screen doesn’t resize with the window, or copy and paste between host and guest doesn’t work, install them manually:
sudo apt update && sudo apt install -y open-vm-tools-desktop
sudo reboot
How to Install Kali Linux on Bare Metal
Burn the Kali ISO to a USB drive with Rufus or balena Etcher, create bootable USB drive and boot from it, and run the same graphical installer — but this time it writes directly to your physical disk. This method gives the best performance but will erase everything on the target drive.
- Download the Kali ISO from kali.org/get-kali.
- Create a bootable USB using Rufus (Windows) or balenaEtcher (Windows/macOS/Linux). Select the ISO, pick your USB drive, and flash.
- Boot from USB — restart your machine and enter the BIOS/UEFI boot menu (usually F2, F12, or Del). Select the USB drive. If it doesn’t show up or refuses to boot, disable Secure Boot in the UEFI settings and try again.
- Follow the graphical installer — same steps as VirtualBox, except at the partitioning stage you are choosing a real disk. Double-check the target before confirming.
- Install GRUB to the disk, reboot, remove USB.
⚠️Warning: The steps above erase the whole target disk. If you want to keep Windows, follow the dual boot steps below instead, and back up your data first. Partition mistakes on real hardware are not recoverable with an undo button.
How to Dual Boot Kali Linux with Windows
A Kali Linux dual boot keeps Windows on the same drive and lets you choose either system at startup. It takes about 30 minutes, and almost all of the risk sits in step 2, so read that one twice.
- Prepare Windows. Back up your files. If BitLocker is on, save your recovery key and suspend protection. Turn off Fast Startup (Control Panel → Power Options → Choose what the power buttons do) so Windows fully releases the disk.
- Free up space. Open Disk Management (
diskmgmt.msc), right-click the C: volume, choose Shrink Volume, and shrink it by at least 50 GB. Leave the new space unallocated; don’t format it. - Boot the Kali installer USB as described in the bare metal section and choose Graphical Install.
- Partition carefully. At the partitioning screen, choose Guided – use the largest continuous free space. Kali goes only into the space you freed, and the Windows partitions stay untouched.
- Install GRUB to the same disk when asked. On UEFI machines it sits alongside the Windows Boot Manager.
- Reboot and test both systems. The GRUB menu should list Kali and Windows Boot Manager.
If Windows is missing from the GRUB menu, boot into Kali and turn on OS detection:
sudo apt install -y os-prober
echo 'GRUB_DISABLE_OS_PROBER=false' | sudo tee -a /etc/default/grub
sudo update-grub
If the PC always boots straight into Windows, open the UEFI boot order (often F2 or Del at power-on) and move the kali entry to the top.
How to Create a Bootable Kali Linux USB (Live Boot)
A bootable Kali USB lets you run Kali directly from the USB drive without installing anything on the host machine. This is ideal for quick assessments, live demos, or machines you don’t own.
Download the Live image (not Installer) from kali.org/get-kali.
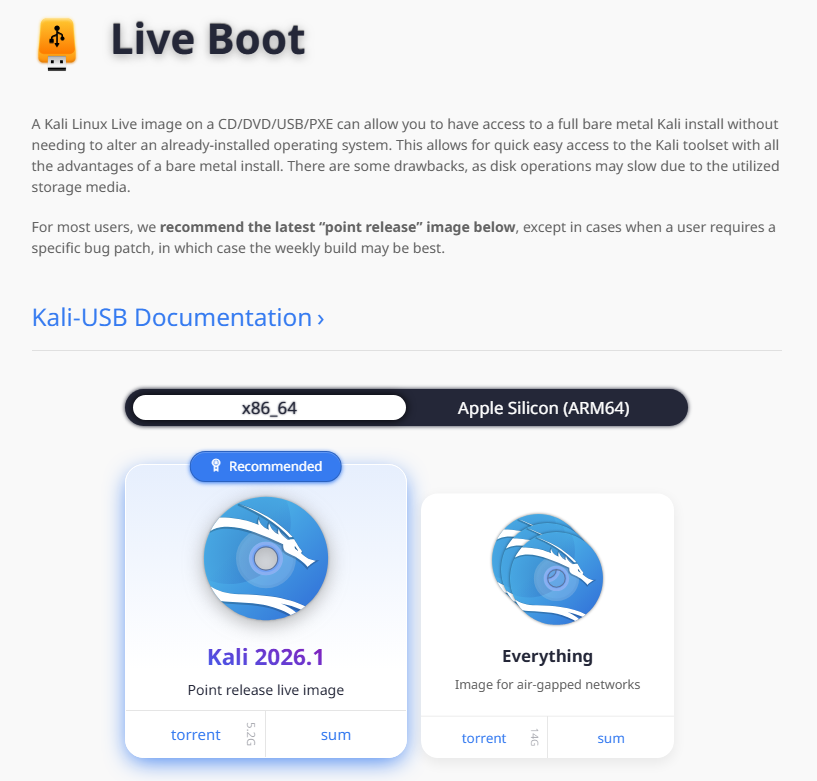
Plug in your USB drive, open Rufus, and click SELECT to choose the Kali Live ISO you just downloaded.
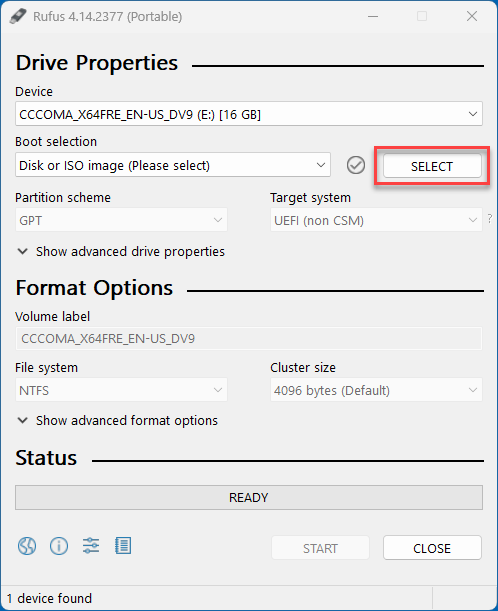
With the ISO loaded and your USB drive picked under Device, click Start to begin writing.
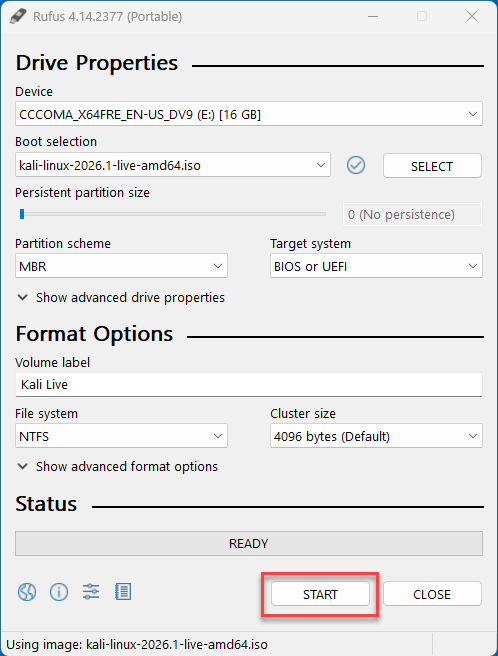
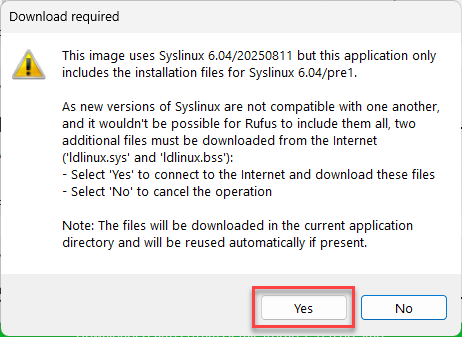
Rufus needs a matching version of Syslinux that isn’t bundled in the app. Click Yes to download the required files (ldlinux.sys and ldlinux.bss) — this is normal and completely safe.
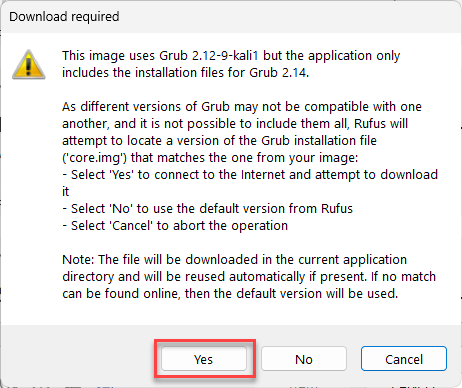
Next, Rufus asks to fetch the correct Grub bootloader files for your Kali ISO. Click Yes to let it download them.
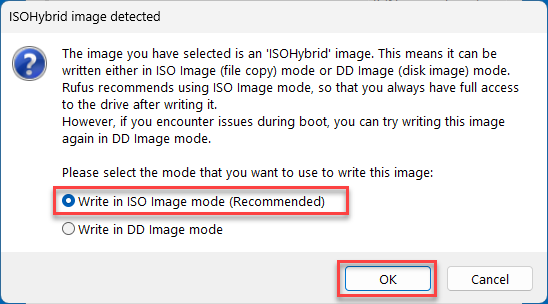
Kali ships as an ISOHybrid image, so Rufus asks how to write it. Keep Write in ISO Image mode (Recommended) selected and click OK.
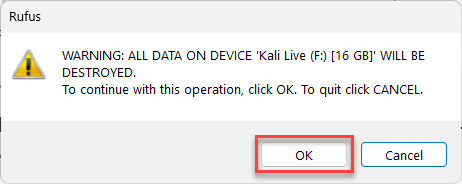
Back up anything important on the USB first — this final warning means Rufus is about to erase the entire drive. Confirm you picked the right device, then click OK to start flashing.
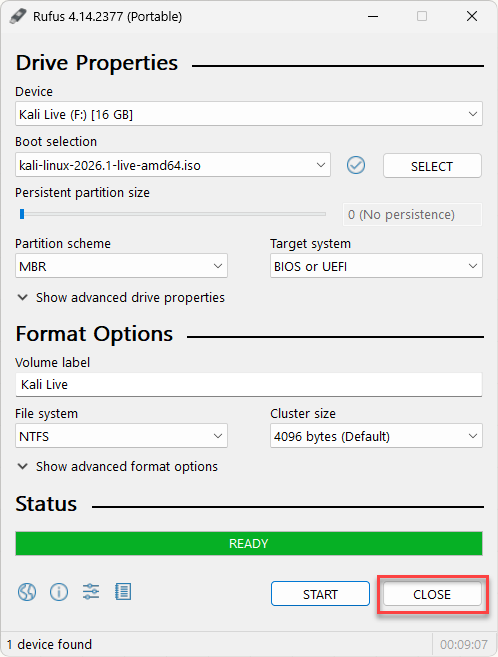
Rufus now writes the image to your USB. Wait for the status bar to read READY — depending on your drive speed, this takes a few minutes.
Boot from the USB. Select Live (amd64) from the boot menu.
Caution: By default, a Kali live USB forgets everything when you reboot. To keep files and settings, add a persistence partition as shown below.
Add Persistence to Your Kali Live USB
Kali’s official persistence method runs on Linux. Any Linux system works, including the Kali live USB itself booted on a second PC. First find your USB device name with lsblk; it shows up as something like /dev/sdb. Use the right letter, because the commands below erase whatever they point at.
# Create partition 3 in the free space: n, p, Enter for defaults, then w
sudo fdisk /dev/sdX

sudo mkfs.ext4 -L persistence /dev/sdX3
sudo mkdir -p /mnt/kali_usb
sudo mount /dev/sdX3 /mnt/kali_usb
echo "/ union" | sudo tee /mnt/kali_usb/persistence.conf
sudo umount /dev/sdX3
Boot from the USB and pick Live USB Persistence from the boot menu. You need to choose that entry every time; the plain Live entry ignores your saved data. Kali’s persistence documentation also covers encrypted persistence and multiple stores.
What to Do After Installing Kali Linux
Most how to install Kali Linux guides stop at login. That’s like handing someone car keys without mentioning the mirrors. Run through this list after your first boot:
- Update everything:
sudo apt update && sudo apt full-upgrade -y - Change the default credentials if you used a pre-built VM image (default is
kali/kali). - Enable the firewall:
sudo ufw enable - Take a VM snapshot (VirtualBox and VMware users) — if you break something during testing, you roll back in seconds.
- Install additional tools as needed:
sudo apt install kali-tools-top10gives you the ten most popular penetration testing tools.
Troubleshooting Common Kali Linux Installation Errors
Most Kali installation guides skip troubleshooting. Here are the issues I’ve seen most often across student lab environments:
“No bootable medium found” in VirtualBox
You forgot to attach the ISO to the virtual optical drive. Power off the VM → Settings → Storage → add the ISO.
VT-x/AMD-V not available or the VM won’t start
Hardware virtualization is switched off. Reboot into your BIOS/UEFI, enable Intel Virtualization Technology (VT-x) or SVM Mode (AMD-V), save, and boot again. On Windows 11, VirtualBox can also run slowly while Memory Integrity is on; turning it off under Windows Security → Device security → Core isolation usually helps.
Installer freezes at “Detecting hardware”
Your VM has too little RAM. Shut down and increase the allocation to at least 2048 MB.
Black screen after GRUB on bare metal
Your GPU needs a kernel parameter. At the GRUB menu, press e, find the linux line, add nomodeset before quiet, press F10 to boot.
Wi-Fi adapter not detected
Kali doesn’t include proprietary firmware by default. Install it:
sudo apt install firmware-iwlwifiReboot and check iwconfig.
That package covers Intel cards. For Realtek or Atheros chips, install firmware-realtek or firmware-atheros instead. If you need monitor mode and packet injection, most built-in laptop cards won’t do it. A USB Kali Linux Wi-Fi adapter with a well-supported chipset, such as the Atheros AR9271 or MediaTek MT7612U, is the reliable choice, and inside a VM you must pass it through as a USB device.
VirtualBox display stuck at 800×600
Install Guest Additions (see Step 4 above) and reboot. If that doesn’t work, check that 3D acceleration is disabled in VM settings.
Frequently Asked Questions
Is Kali Linux free to download and use?
Yes. Kali Linux is completely free and open source. It’s developed by OffSec and distributed under the GPL license. You can download it from the official site at kali.org/get-kali without paying anything.
Can I install Kali Linux alongside Windows (dual boot)?
You can dual boot Kali Linux with Windows by choosing manual partitioning during installation and allocating a separate partition for Kali. Resize your Windows partition first using Disk Management, then install Kali to the free space. GRUB will give you a boot menu to pick either OS at startup. Always back up your data before attempting a dual boot setup.
Is it safe to install Kali Linux on my main computer?
It’s safe in the sense that Kali won’t damage your hardware, but it is designed as a penetration testing tool, not a daily driver. Running Kali as your primary OS means you’re operating as root-capable on a distro packed with hacking tools, which increases your attack surface. For everyday use, install it inside VirtualBox instead.
What is the difference between the Kali Installer image and the Live image?
The Installer image writes Kali permanently to a disk (physical or virtual). The Live image boots Kali directly into RAM from a USB drive without installing anything — changes disappear on reboot unless you configure a persistent partition. Use the Installer for a dedicated setup; use the Live image for portable, temporary sessions.
Do I need internet access during Kali Linux installation?
No. The Kali installer works fully offline because the ISO includes all necessary packages. However, connecting to the internet during installation lets the installer pull the latest package versions and security updates, which saves you a large post-install update.
Which desktop environment does Kali Linux use?
Kali Linux defaults to the Xfce desktop environment. As of Kali 2026.1, it ships with Xfce 4.20.6. You can also choose GNOME, KDE Plasma, or a minimal install during the setup process. Xfce is the lightest option and runs well even on 2 GB of RAM.
Can I install Kali Linux on VMware for free?
Yes. Kali Linux is free, and VMware Workstation Pro has been free for personal use since November 2024, so a Kali Linux VMware setup costs nothing for a home lab. Download the prebuilt VMware image from kali.org/get-kali, extract it, and open the .vmx file in Workstation, or install from the ISO if you want a custom setup.
Is VirtualBox or VMware better for a Kali Linux virtual machine?
Both run a Kali Linux virtual machine well and both are free for personal use. VirtualBox installs faster and needs no account, which makes it the easier start for beginners. VMware Workstation tends to handle screen resizing, clipboard sharing, and USB Wi-Fi adapters with less setup, so it suits a lab you plan to keep.
Related Guides
- Building a full home lab? See our EVE-NG installation guide to add network simulation alongside your Kali VM.
- Setting up gateway redundancy for a lab network? Check out how to configure HSRP on Cisco routers.
- Need LaTeX for writing up pentest reports? Read how to install LaTeX on Linux.
Conclusion
You now have four clear paths to install Kali Linux: VirtualBox or VMware for safe experimentation, bare metal (or a dual boot next to Windows) for raw speed, and a USB live boot for portability. Start with a virtual machine, follow the steps above, and you’ll be inside a working Kali desktop in under 30 minutes.
Once you’re in, update your packages, snapshot your VM, and start exploring the tools. For more hands-on Linux and cybersecurity walkthroughs, check out the guides on ITPro Academy.

Usman Hassan
Network Engineer | System Administrator | MCT
I am working in IT field 15 years, working as Network Engineer and also MCT (Microsoft Certified Trainer).
Excellent and highly informative article! It provides a clear, well-structured explanation of the topic with practical insights that are easy to understand and apply. The step-by-step approach, combined with real-world examples and best practices, makes it valuable for both beginners and experienced IT professionals. I especially appreciate the focus on implementation, troubleshooting, and security considerations, which adds significant practical value. Thank you for sharing such a comprehensive resource—looking forward to reading more high-quality technical content like this.
Hi! This post couldn’t be written any better! Reading this post reminds
me of my good old room mate! He always kept talking about this.
I will forward this page to him. Fairly certain he will have a good read.
Thanks for sharing!